How to Solve a Logic Puzzle

If you're new to grid-based logic puzzles, this tutorial will teach you the basics. Start with the "Introduction" first, then move on to the tutorials discussing specific clues or solving methods. Each tutorial contains a number of different slides - you can advance to the next slide by clicking "Next slide" at the bottom of each page, or by using the circled numerical links below each slide. Choose your specific tutorial from the list below to get started.


  • Introduction
  • True and False Clues
  • Multi-Elimination Clues
  • Neither/Nor Clues
  • Either/Or Clues
  • Greater/Lesser Than Clues
  • Unaligned Pair Clues
  • Transpositions
  • Parallel Cross Eliminations
  • Skewed Cross Eliminations
  • Pseudo-True Pairs (Aligned)
  • Pseudo-True Pairs (Staggered)
  • Transitive Relationships (Either/Or)
  • Transitive Relationships (Unaligned Pair)
  • Comparative Relationships
  • Trial and Error
  • Taking Notes

  • Introduction


    • Slide #1

      A grid-based logic puzzle can seem daunting if you've never solved one before, but don't get discouraged - once you learn a few basic rules you'll be on your way to completing your first grid in no time.

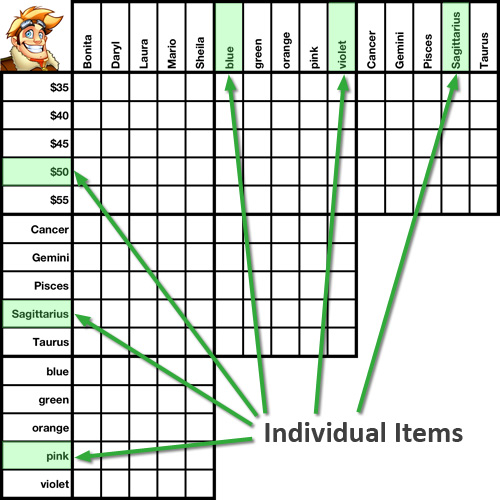
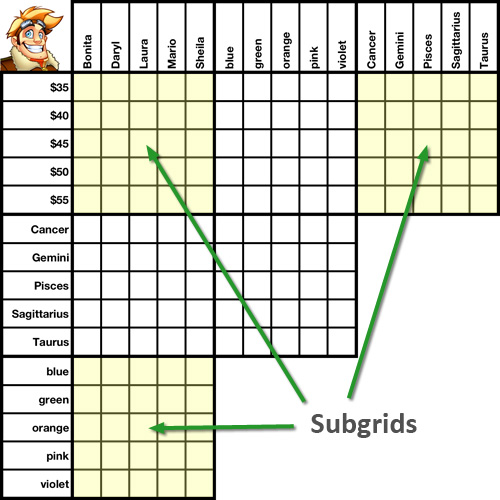
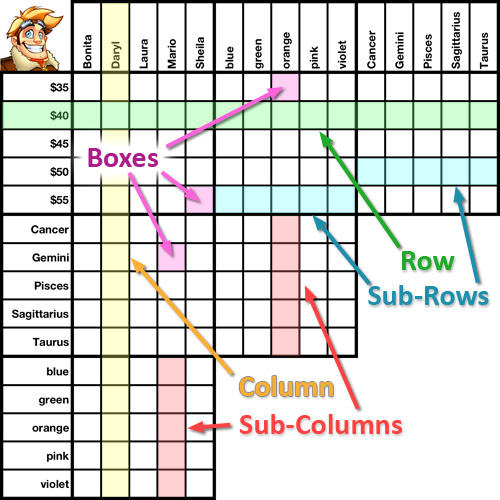
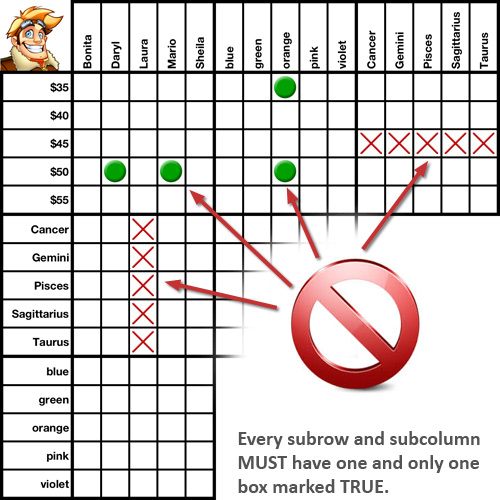
      Each logic puzzle is comprised of a list of clues and a grid like the one you see here on your left. The grid will display a certain number of categories (in this case, 4) and a certain number of items per category (in this case, 5). Every item is matched to one, and only one, other item in each category, and no two items in a category will ever be matched to the same item in another category.

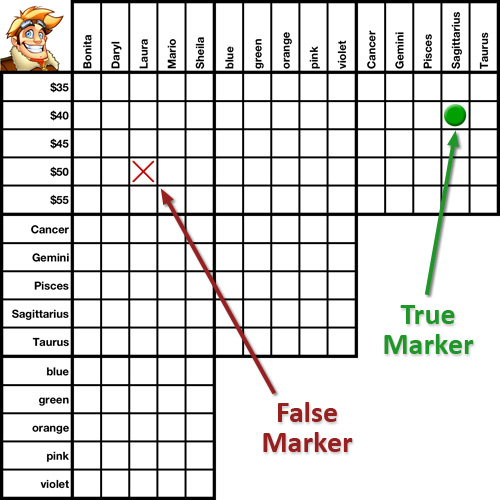
      Your goal is to figure out each item's matches, using just the clues given and pure logical deduction.


      Next slide »


    • Slide #2

      Every puzzle has a set number of categories. In this example, there are four - Prices (green), Names (yellow), Colors (pink) and Zodiac Symbols (blue). Notice how the last two categories (pink and blue) are repeated on both the top and left sides. All logic puzzle grids will follow this same pattern.

      Why? The point of the logic grid is to determine whether any given item is or is not matched with any other given item. This configuration of categories allows every single item on the grid to intersect with every other item on the grid once, and only once.


      « Prev slide »Next slide »


    • Slide #3

      Every item on the grid is labeled on either the left-side or the top-side, or both, depending on the category it is in. In this example there are five items for every category - i.e. Bonita, Daryl, Laura, Mario and Sheila are the five items in the "Names" category. Blue, Green, Orange, Pink and Violet are the five items in the "Colors" category, and so on.


      « Prev slide »Next slide »


    • Slide #4

      The larger areas where each category intersects are called "subgrids". Each subgrid will always be a square that is outlined in a slightly heavier black line.

      In this example, the yellow subgrid at the top-left is the Prices-Names subgrid, because it is where the Prices category and the Names category intersects. There are six subgrids total in this sample puzzle.


      « Prev slide »Next slide »


    • Slide #5

      Every item on the grid has a column (yellow) and/or a row (green) representing it. Each column and row travels across the full-width or full-height of the grid at that point (heights and widths will vary depending on the category).

      A sub-section of a column or row that is housed entirely within a single subgrid is referred to as either a sub-column (pink) or a sub-row (blue).

      The smallest squares on the grid, where individual items intersect, are called boxes (purple).


      « Prev slide »Next slide »


    • Slide #6

      The purpose of the grid is to represent (via boxes) the relationships between every possible combination of every item. Your goal is to fill each of those boxes with either a TRUE marker (green circle) or a FALSE marker (red X), based on your reading of the given clues.


      « Prev slide »Next slide »


    • Slide #7

      There are two hard rules to always remember in logic puzzles:

      1. Every item in the puzzle is matched to one, and only one, other item in each category.

      2. No two items in the same category will ever be matched to the same item in another category.

      Following those two simple rules, check out the four sample subgrids shown to the left. Each of these samples is invalid because it breaks one or both of those rules.


      « Prev slide »Next slide »


    • Slide #8

      How do you finish a logic puzzle?

      As you progress through each clue, your task is to translate the relationships described there into TRUE or FALSE markers on the grid. (We'll discuss how to do that starting in the next tutorial). As you proceed through the puzzle, more and more of the grid will be filled in, until all the top subgrids (in this case, there are three) are completely filled in with TRUE markers.

      At that point, you have successfully revealed the relationships between each and every item on the grid, and puzzle is solved.


      « Prev slide »